Safety First!
Select a Secure Circuit Design

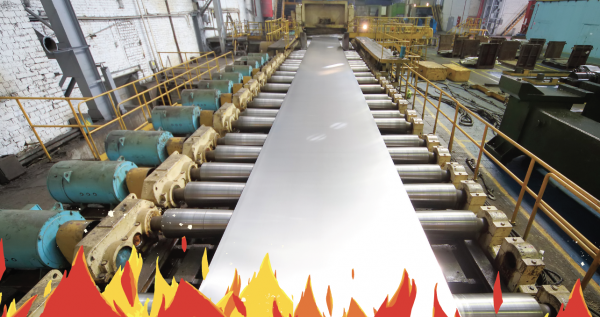
In fluid power applications, safety is the number-one priority in the design of a system. Vacuum lifting, as you can imagine, is often more exposed to personnel than hydraulics and pneumatics because the work piece being handled could be transported through areas of personnel activity. Most pneumatic and hydraulic equipment is behind guarded work areas or inside control panels. The vacuum-lifting equipment in larger work piece-handling applications, such as marble countertop manufacturing or steel stamping in the car industry, is transporting work pieces from a conveyor onto a pallet or from one machining center to another and is fully exposed to the working environment. Of course this area is behind guarding, such as what is shown in Fig. 1. However, during e-stop situations (where the emergency stop has been activated), service personnel might enter the working area to attend to a maintenance issue. If the vacuum tool is in mid cycle, what prevents the tool from dropping the part, causing injury or at least damage to the work piece or machinery?
This article explains basic fundamental features that should be employed to prevent vacuum tools from dropping a part in an emergency stop or power failure situation.
Fig. 2 shows a typical vacuum circuit—a single venturi connected to multiple vacuum cups. This circuit is very effective in performing a simple grab-and-release vacuum cycle. If this circuit was employed in a production environment where there was an electrical e-stop condition, the power to the control valve (a) would cease and the valve would close, cutting off air supply to the venturi and resulting in dropping of the part.
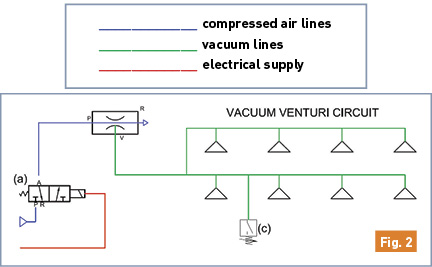
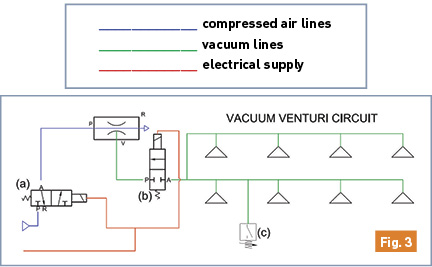
Fig. 3 shows a simple solution to prevent this occurrence. A 2-way solenoid valve (b) has been placed in the vacuum line. This valve is a normally closed configuration so that when the electrical power is lost, the valve isolates the vacuum “power” between it and the vacuum cups. The cups will maintain holding force as long as the vacuum level is maintained, which means that the circuit must have a leak-free condition. A vacuum switch (c) is placed on the common vacuum circuit between the 2-way valves and the cups. This switch will set off an alarm once the vacuum level falls to a pre-set point to indicate to the factory personnel that they should clear the area or take evasive action.
If the part being handled is non-porous and the complete circuit is leak-free, then the cups will hold onto the part indefinitely. Of course in most cases, leaks are present due to improper connection of components. Therefore, the hold time for this circuit could be limited to only a few minutes. If this is the case, then a circuit such as Fig. 4 could be employed. This uses a vacuum reservoir to add volume to the cup circuit so that if there is a leak during an e-stop situation, it will take longer for the vacuum level between the e-stop valve (b) and the cups.
This is a common installation, but the problem is that each time the venturi starts vacuum in the circuit, it has to evacuate the reservoir, which adds to the overall cycle time. This could be extensive depending on the size of the reservoir employed.
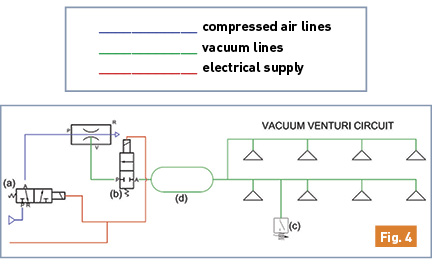
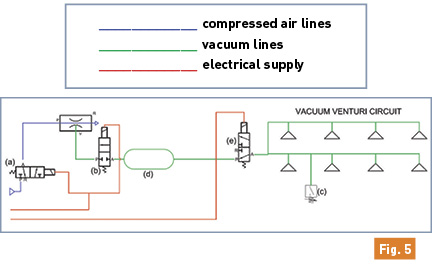
Fig. 5 has an additional vacuum valve (e). This is a normally open valve where the valve is open if power is lost. This valve will be used in normal operation to activate the vacuum cups. Consequently, valves (a) and (b) will always be powered on, allowing vacuum to reach the control valve (e). This control valve will be powered on to release the cups holding the load and powered off to grip the part—a very simple and extremely effective solution. Of course, the pneumatic control valve (a) is now completely redundant and can be, in effect, removed. This means that air will always be supplied to the venturi. An energy-saving circuit should be employed on the venturi so that it can run automatically, only coming on when required.
All the circuit illustrations show a compressed air-powered venturi or ejector. This circuit can also be used with a vacuum pump as shown in Fig. 6.
